


Electric fences are a cost-effective, low-maintenance, and humane way to keep livestock in and predators out. Whether you’re securing your garden, farm, or property, installing an electric fence can be a relatively simple process if you follow the right steps. In this beginner’s guide, we’ll walk you through everything you need to know to get started.
What You’ll Need:
Before you begin the installation process, gather the following tools and materials:
- Electric Fence Energizer: The heart of the system, this converts power from your outlet or battery into an electrical pulse that travels through the fence.
- Wire: Electric fence wire can be made of different materials such as steel, aluminum, or poly-wire. The thickness and material depend on your needs (e.g., livestock or garden protection).
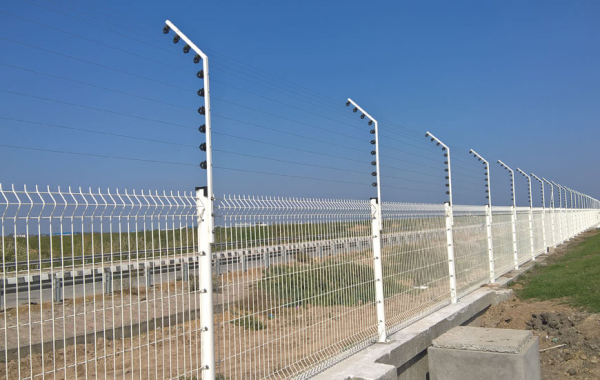
- Fence Posts: These are used to hold the wires in place. You can use wood, steel, or fiberglass posts, depending on your preferences.
- Insulators: These keep the electric wires from touching the posts and shorting out.
- Grounding Rod: An essential component to ensure the fence works effectively.
- Fence Tester: To check the electrical current running through your wires.
- Tools: Pliers, wire cutters, tape measure, and a post driver (for installing posts).
Step 1: Plan Your Fence Layout
The first thing you need to do is plan the layout of your electric fence. Start by determining where you want to run the fence and how much area you need to enclose. Mark the location of your posts and ensure that the fence will be high enough to deter animals or unwanted visitors.
- Spacing Posts: Space your fence posts about 10 to 15 feet apart for a stable structure. The distance depends on the type of wire you’re using and the terrain.
- Terrain Considerations: If you’re dealing with uneven or rocky ground, make sure your posts are securely installed so the fence will remain upright.
Step 2: Install the Fence Posts
Begin by installing the fence posts at the locations you marked earlier. Use a post driver to make sure they’re securely in the ground, and ensure the posts are at least 3 to 4 feet high above the ground for good clearance.
- Spacing: As mentioned earlier, posts should be spaced evenly (about 10-15 feet apart). In areas with frequent wind, you may want to space the posts closer together for extra stability.
- Alignment: Ensure that all the posts are in a straight line or follow the desired fence shape.
Step 3: Install the Insulators
Next, attach the insulators to the fence posts. These will prevent the electric wire from touching the posts, which could lead to a short circuit. Insulators come in several varieties, including nail-on, screw-on, or clip-on designs, depending on the type of post you’re using.
- Placement: Install insulators about 4-6 inches from the top of the post to ensure the wire is held securely.
- Quantity: You’ll need enough insulators for each post that will hold the electric wire.
Step 4: Stretch and Attach the Electric Fence Wire
Now it’s time to install the electric fence wire. Start at one end of your fence line and work your way to the other. It’s often easiest to run the wire along the posts while it’s still in the spool, then cut and stretch it to the correct length once you’ve attached it to the posts.
- Wire Tension: Be sure to stretch the wire tightly but not so much that it risks snapping. Use tensioners on each end of the fence to keep the wire taut.
- Attaching the Wire: Use wire clips or other fasteners to attach the wire to the insulators, ensuring the wire doesn’t touch the posts directly.
Step 5: Ground the Fence
For the electric fence to work properly, it needs to be grounded. This is a crucial step that ensures that the electrical pulse flows through the wire and can return to the ground, completing the circuit.
- Grounding Rod: Use a metal grounding rod that is at least 6 feet long and place it in the ground, at least 10 feet away from the energizer.
- Connection: Attach the ground wire from the energizer to the grounding rod. It’s essential to make sure the connection is secure and free of corrosion.
Step 6: Connect the Energizer
Once everything is in place, connect the energizer to your fence wire. The energizer is powered either by electricity or batteries, depending on your setup.
- Electric Energizers: If you have access to mains electricity, plug the energizer into a power outlet.
- Battery-Powered Energizers: If you’re in a remote area, opt for a battery-powered energizer and make sure to check the battery regularly.
- Connections: Follow the manufacturer’s instructions carefully for wiring the energizer to the fence.
Step 7: Test the Electric Fence
Once everything is connected, it’s time to test the fence. Use a fence tester to ensure the electrical current is running properly through the wire. Check for any weak spots or breaks in the circuit.
- Voltage Levels: A typical electric fence should have a voltage of between 2,000 to 10,000 volts, depending on what you’re keeping out or in.
Step 8: Regular Maintenance
Maintaining your electric fence is crucial for ensuring it remains effective. Regularly check for signs of wear and tear, corrosion, or any gaps in the fence. Additionally, make sure the energizer is functioning correctly and the batteries are charged.
FAQs About Electric Fence Installation
1. How do I know if my electric fence is working?
Use a fence tester to measure the voltage at various points along the wire. A voltage of 2,000 to 10,000 volts is ideal for most electric fences.
2. Can I install an electric fence myself?
Yes, installing an electric fence is a DIY project that most beginners can manage with the right tools and instructions.
3. How far apart should fence posts be for an electric fence?
Generally, posts should be spaced between 10-15 feet apart. The exact spacing depends on the type of fence wire and terrain.
4. What kind of wire should I use for an electric fence?
Steel wire is the most common, but aluminum wire or poly-wire can also be used, depending on your needs.
5. How much power does an electric fence need?
The energizer should deliver between 2,000 and 10,000 volts, depending on the type of animals or intruders you’re keeping out.