Patio lighting service is an excellent way to enhance the atmosphere of your outdoor space, whether you are looking to brighten your backyard for evening entertaining or create a cozy ambiance for family gatherings. The right lighting not only improves the aesthetics of your patio but also increase its functionality and safety during the night. Installing patio lighting may seem daunting at first, but with the proper tools and a clear plan, you can transform your outdoor area into a beautiful, well-lit space that’s perfect for any occasion.
This guide will walk you through the process of installing patio lighting, from planning your design and selecting the right lights to ensuring proper installation and maintenance. With these steps, you can create a stunning outdoor setting that suits your needs and elevates your home’s exterior.
Step 1: Plan and Design Your Patio Lighting Layout
Before you start purchasing lights or installing anything, it’s important to design your lighting layout. Begin by assessing your patio space and determining the areas that need illumination. Consider the size and shape of your patio, where you spend the most time, and which areas you want to highlight. Think about ambient lighting for a soft, relaxing atmosphere, task lighting for dining or cooking areas, and accent lighting to highlight special features such as plants or sculptures.
Consider how your lighting will interact with the space, and ensure that it complements your outdoor furniture, landscaping, and overall style. Mapping out the layout in advance will help you decide which lighting fixtures to buy, how many you need, and where to place them.
Step 2: Choose the Right Type of Lighting
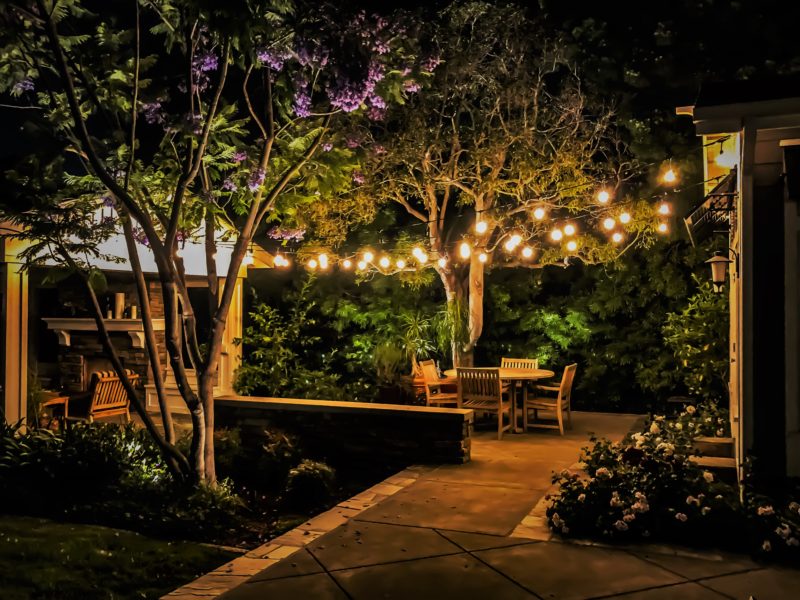
There are many types of lighting available for patios, and each serves a different purpose. Start by deciding which lighting styles will best fit your space and needs. String lights are a popular choice because they add a festive and warm glow, making them ideal for relaxing evenings with friends or family. You can hang them along the edge of your patio or drape them over structures such as pergolas or fences.
Post and pillar lights work well for providing soft illumination along pathways, while floodlights are perfect for larger outdoor spaces that require more intense lighting. Lanterns are another great option for creating a cozy, inviting atmosphere and can be placed on tables or hung from trees or posts. Spotlights and accent lights are ideal for drawing attention to architectural features or garden elements, such as trees, sculptures, or water features.
Step 3: Determine Power Sources for Your Lights
One of the key aspects of patio lighting installation is choosing the appropriate power source. There are three primary options for powering outdoor lights: solar, battery-operated, and wired lights.
Solar-powered lights are a convenient and eco-friendly option, as they don’t require any wiring. They charge during the day and automatically turn on at night, making them a low-maintenance solution for smaller patios or decorative lighting.
Battery-operated lights are also simple to install, requiring no wiring but needing periodic battery changes. These lights are perfect for areas where you want a temporary setup or a less permanent lighting solution.
If you prefer a more permanent solution with brighter illumination, wired lights are the way to go. These require an electrical outlet or an extension cord to power the lights. For safety, make sure the wiring and connections are weatherproof and rated for outdoor use.
Step 4: Gather the Necessary Tools and Materials
Once you have selected the lighting fixtures and determined your power source, gather the necessary tools and materials to complete the installation. You will need basic tools such as a drill, screwdrivers, a ladder, and electrical tape (if working with wired lights). For solar and battery-operated lights, installation is relatively simple and requires minimal tools, mostly for securing lights in place.
If you are working with wired lights, you may also need outdoor-rated extension cords or an outdoor power strip. Be sure to also check if any mounting hardware is required for your chosen lighting, such as hooks for string lights or stakes for pathway lights. Having all your tools and materials ready will ensure the process goes smoothly without any interruptions.
Step 5: Install the Lights and Fixtures
With your plan in place and tools at hand, it’s time to start the installation process. Begin by securing your lights in the locations you mapped out during the planning phase. For string lights, attach hooks or nails to your patio structure to hang the lights securely. Be careful not to over-tighten the lights, as this could cause them to sag or break.
For larger fixtures, such as post lights, follow the manufacturer’s instructions for mounting them on the ground or along walls. If you are installing wired lights, carefully follow the wiring diagram provided by the manufacturer. Make sure the connections are secure and properly insulated to prevent water damage and electrical hazards.
Once all the fixtures are in place, take a moment to test the lights and ensure they are working correctly. For solar-powered lights, check that they receive enough sunlight during the day to charge fully. If you are using battery-operated lights, replace the batteries as necessary. If you are using wired lights, double-check the connections to ensure proper function.
Step 6: Adjust and Fine-Tune the Lighting
After all the lights are installed, step back and evaluate how the space looks. Ensure the lighting is distributed evenly and that all areas are illuminated according to your plan. Adjust the angles of any spotlights or floodlights to highlight key features such as garden elements, sculptures, or your patio furniture.
For string lights, make sure they are taut but not too tight, so they hang gracefully. If you have any lanterns, adjust their placement to enhance the cozy ambiance. Test the brightness and placement of each light fixture to ensure the overall effect is as you envisioned it. Don’t hesitate to make minor adjustments to achieve the desired atmosphere.
Step 7: Ensure Safety and Durability
One of the most important aspects of patio lighting installation is ensuring safety and durability. If you are using wired lights, make sure all wiring is properly insulated and rated for outdoor use. Exposed wires can pose a risk of electrical shock, so always make sure the connections are weatherproof.
Additionally, check that your lights are properly secured to prevent them from being knocked over or damaged by wind. If you live in an area prone to harsh weather conditions, it’s important to ensure that your fixtures are weatherproof and durable. Consider investing in lights that are rated for outdoor use and can withstand rain, snow, or extreme temperatures.
Lastly, if you are working with electricity, be sure to follow all local electrical codes, or consult a licensed electrician if you are unsure about how to safely connect your lights to your home’s power source.
Step 8: Perform Regular Maintenance
To ensure your patio lighting continues to function properly, regular maintenance is necessary. Keep your lights clean by wiping them down regularly to remove dust, dirt, and cobwebs. If you are using solar-powered lights, make sure the panels are free of debris so they can charge effectively. For battery-operated lights, replace the batteries as needed to maintain consistent lighting.
For wired lights, check the connections periodically to ensure they are still secure and free from moisture. If any lights are damaged or malfunctioning, replace the bulbs or fixtures promptly to keep the lighting system in optimal condition.
Conclusion
Installing patio lighting can significantly enhance the atmosphere of your outdoor space, making it a more enjoyable and functional area for gatherings, relaxation, and evening activities. By following these simple steps—from planning and selecting the right lights to installation and maintenance—you can create a beautifully lit patio that serves as the perfect outdoor retreat. With a little effort, you can enjoy a well-lit, inviting patio that will make your outdoor space shine for years to come.