Yoga is a practice that brings physical, mental, and spiritual well-being into harmony. There are various asanas (poses) in yoga that strengthen, stretch, and challenge the body in unique ways. One such pose that is popular for building strength and endurance is the Plank Yoga Pose (known as Phalakasana in Sanskrit). This pose, which resembles a strong, steady plank, engages multiple muscle groups and has numerous benefits for the body.
What is the Plank Pose in Yoga?
The Plank Yoga Pose is a fundamental pose in many yoga sequences. It’s a full-body strengthener that primarily targets the core but also strengthens the arms, legs, and back. The pose is an excellent exercise for building endurance and improving posture.
In its most basic form, the Plank Pose involves holding your body in a straight line, supported by your hands (or forearms) and toes. The key is to maintain a firm body alignment, engaging your core muscles while keeping your back flat and your head aligned with your spine.
How to Perform the Plank Pose (Phalakasana)
Here’s a step-by-step breakdown of how to perform the Plank Yoga Pose:
Start in a Tabletop Position: Begin on all fours, with your wrists directly under your shoulders and your knees under your hips. Your fingers should be spread wide to create a strong base of support.
Step Your Feet Back: Begin to walk your feet back, one foot at a time, until your body forms a straight line from your heels to the top of your head. Ensure your body is aligned, and avoid letting your hips sag or lift too high.
Engage Your Core: Tighten your abdominal muscles by drawing your navel toward your spine. This will help prevent your lower back from arching and keep your body in a strong, straight line.
Firm Your Hands and Feet: Press the palms of your hands firmly into the ground, ensuring that the weight is evenly distributed. Your feet should be hip-width apart, pressing into the floor as you engage your legs.
Hold the Position: Keep your body in a straight line, and breathe deeply. Hold the pose for as long as you can, gradually increasing the duration as you gain strength.
Come Down Slowly: When you’re ready to release, gently lower your knees to the floor, or drop your body down into Chaturanga Dandasana (Four-Limbed Staff Pose) if you’re transitioning into another asana.
Alignment Tips for a Safe and Effective Plank Pose
Maintaining proper alignment is crucial to avoid injury and get the maximum benefits from the Plank Pose. Here are some alignment tips to help you stay safe while performing the pose:
- Neutral Spine: Ensure your spine stays in a neutral position, without arching or rounding your back. Engage your core to prevent your lower back from sagging.
- Shoulders Over Wrists: Keep your shoulders directly over your wrists to avoid straining your shoulders and wrists.
- Long Neck: Avoid dropping your head or craning your neck. Keep your head in line with your spine, gazing down at the mat or slightly forward.
- Firm Core: Actively engage your abdominal muscles. Think of drawing your belly button toward your spine to support your lower back.
- Legs Strong: Your legs should be active in the pose. Engage your thighs, lift your kneecaps, and press your heels back to activate your leg muscles.
Benefits of the Plank Yoga Pose
The Plank Yoga Pose offers a wide range of benefits, both physically and mentally. Here are some of the key advantages:
Core Strength and Stability
The Plank Pose is one of the best exercises for strengthening the core. Holding the position engages the abdominals, obliques, and lower back muscles, which are responsible for maintaining posture and balance. A strong core is essential for overall body strength and injury prevention.
Improved Posture
A strong core helps to stabilize the spine, and regularly practicing the Plank Pose can improve your posture over time. The muscles you strengthen in the core, back, and shoulders help you maintain a straight, tall posture throughout the day.
Enhanced Flexibility
While the Plank Pose primarily focuses on strength, it also enhances flexibility in the wrists, shoulders, and legs. As you hold the pose, the body opens up and lengthens, improving your overall flexibility in these areas.
Arm and Shoulder Strength
The Plank Pose engages the muscles of the arms and shoulders as you hold your body weight. This helps to tone and strengthen the upper body, including the triceps, biceps, deltoids, and pectorals.
Full-Body Strength
In addition to strengthening the core and upper body, the Plank Pose also works the glutes, thighs, and legs. It’s a full-body exercise that helps build strength and endurance throughout the body.
Mental Toughness
Holding the Plank Pose can be challenging, especially when you first start practicing. It requires focus, determination, and mental resilience. Over time, holding the pose longer builds mental toughness, as you learn to endure discomfort and push through challenges.
Improves Balance and Coordination
The Plank Pose demands balance and coordination as you hold your body in a straight line. This practice improves your ability to stabilize and coordinate your movements, which benefits other physical activities and yoga poses.
Variations of the Plank Pose
If the traditional Plank Pose feels too challenging or you want to switch up your practice, there are several variations you can try:
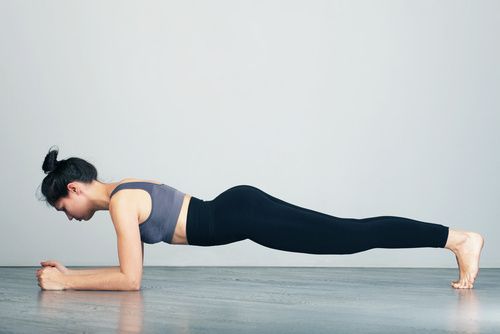
1. Forearm Plank (Makara Phalakasana)
In the Forearm Plank, you drop down onto your forearms instead of your hands. This variation is easier on the wrists and can help to target the core even more intensely. The form remains the same—press your forearms into the mat and engage your core while keeping your body in a straight line.
2. Side Plank (Vasisthasana)
For a more challenging variation, try the Side Plank. From the Plank Pose, shift your weight onto one hand and stack your feet, then rotate your body to face sideways. The side plank focuses on the obliques and arms while requiring balance and coordination.
3. Plank with Leg Lift
To make the traditional Plank Pose more intense, try lifting one leg at a time. Lift your right leg as high as you can without compromising your form, then lower it and repeat with the left leg. This variation adds extra challenge for the core and strengthens the glutes and lower body.
4. Plank to Chaturanga
You can integrate the Plank Pose with the Four-Limbed Staff Pose (Chaturanga Dandasana) by transitioning from Plank to Chaturanga. This adds fluidity to your practice while building upper body strength and endurance.
Tips for Beginners
- Start slow: If you’re new to the Plank Pose, begin by holding it for 10 to 15 seconds, gradually increasing your time as you build strength.
- Use modifications: If you’re unable to hold the full Plank Pose, start by performing the pose with your knees on the ground. This will still help build strength in your core and upper body while reducing the intensity.
- Practice regularly: The more often you practice, the stronger you’ll get. Make the Plank Pose a regular part of your yoga routine to see progress over time.
Conclusion
The Plank Yoga Pose is a powerhouse when it comes to building core strength, improving posture, and toning the body. It may seem simple at first, but holding it for longer periods requires patience, focus, and mental resilience. Whether you are a beginner or an experienced practitioner, the Plank Pose offers numerous benefits for your physical and mental health. By incorporating this pose into your yoga practice, you’ll not only enhance your overall strength and endurance but also develop the mindfulness and mental toughness that are essential both on and off the mat.